In a previous blog, we have learned about the different types of solar panels available on the market. They are thin-film solar panels, monocrystalline solar panels, and polycrystalline solar panels. From the article, you know each of these is made of silicon, but do you how does it go from raw silicon to the solar panels as end product? So let’s take a deep dive into how silicon solar panels are made and what materials are required to manufacture them.
A step-by-step guide to how solar energy panels are made:
Before we learn anything about how solar panels are made, we need to understand what types of solar cells are used. These solar cells that we use every day in our solar homes are made up of two types of semiconductors. They are the p-type silicon layer (positively charged) or the n-type silicon layer (negatively charged). And here’s how these work together:
P-type silicon layer:
The foundation layer is what makes all the difference. When it comes to a p-type silicon layer solar cell, it is built on a positively charged base. For a better understanding, here’s what it means – the top layer is mixed with Phosphorus & bottom layer is mixed with Boron.
N-type silicon layer:
Though the p-type is preferred traditionally, the n-type was built the exact opposite way. This includes the top layer being Boron and the bottom layer being Phosphorus. The reason behind this phenomenon is that the layering of boron and phosphorus in this matter was found to provide energy more efficiently.
Now let’s get to the good part, how are solar panels made?
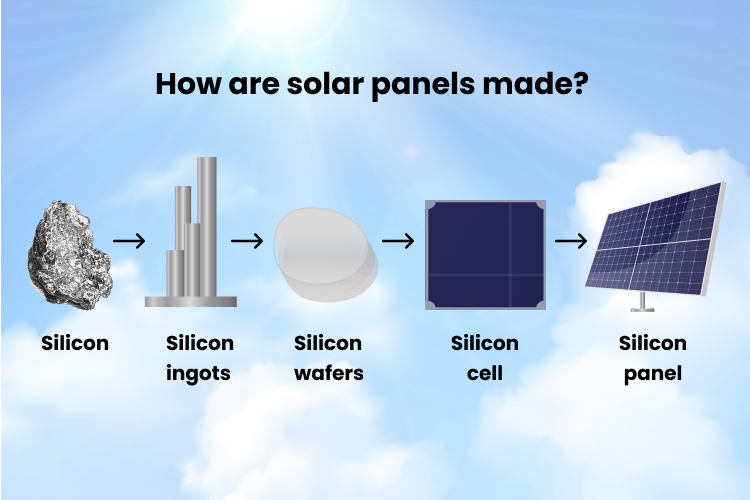
Step 1 – Sand
Any production process, as we all know, starts with raw materials. Though we know that solar panels are made of silicon, did you know that this silicon comes from sand? The sand crystals are covered in silicon in an arc furnace. For a higher quality of silicon, manufacturers tend to use quartz sand as their raw material.
Step 2 – Silicon ingot
Once the silicon is produced, it is then converted into ingots. Ingots are silicon-shaped cylinders where the rocks are melted into these shapes as Boron is mixed into the matter, giving it a positive electrical polarity.
Step 3 – Solar wafers
The silicon ingots are now sliced into thin, paper-like sheets to form a wafer structure. You can refer to the above image to see what these solar wafers look like once they are sliced. These are sliced using a very thin wire to result in a solar wafer that is as thin as a white sheet of paper. As these will be very reflective, an anti-reflective coating is applied to reduce the loss of solar energy.
Step 4 – Solar cells & Solar panels
The wafers are treated first, then metal conductors are added to each surface. This is followed by a layer of phosphorus on the surface, giving it a negative electrical orientation. These cells are later soldered together to form your solar panel. Multiple solar panels will convert houses later into a solar homes.
Stay tuned to SouthWest Sun Solar for more information about such solar industry topics. You can also contact our team to get solar lease services or solar panel installation services. We are here to help you 24/7.